16 June 2014
By Gilbert Mhazo
Winter is here and most farmers would not dare plant tomatoes because of fear of frost. However, there are some simple effective ways of protecting your tomato plants from frost.
Bottles filled with water can be used to protect tomato plants even in the cold winter weather. It is one method which is inexpensive and effective.
Fill 750ml one (1) litre or two (2) litre bottles with water up to ¾ full. Place the bottles upright on the ground every third plant along the row when the plants are still young. Always make sure the bottle neck is 10 cm above the plant top. Raise the bottle as the plant grows to always keep the bottle 10 cm above the plant top by either putting a brick under bottle or by tying the bottles on trellising sticks.
When the temperature drops below freezing, the water in the bottle freezes but the plants stay frost free. Water in the plants has a lot of dissolved minerals in it and will therefore freeze at lower temperatures than water in the bottle which though not pure has less dissolved minerals. When water in the bottles freezes it releases a lot of heat which keeps the air around the tomato plants warmer than the general surrounding area.
Other ways to protect against frost are:-
- High areas away from valleys and slopes that face the sun are better than slopes facing away from the sun.
- Soil type influences frost incidence, eg. growers within the same general climatic and topographical conditions often experience differences in frost damage that seem unexplainable. Possible explanations include differences in soil type, ground cover, soil water content and ice-nucleating bacteria concentrations. Soil type is clearly one aspect of site selection to consider. For example, recently drained swamps are highly prone to sub-zero temperatures. Dry highly organic soils near the surface reduce thermal conductivity and heat capacity, which was purported to cause the colder minimum temperatures. In another example, minimum temperature increases of 1 °C to 3 °C are experienced when mineral soil is mixed with organic soil. Clearly, the soil type affects frost incidences.
- Sprinkler irrigation can be used to control and protect against frost by irrigating lightly very early in the morning to increase humidity in and around the crop field.
- Cover plants with plastic or grass during the night and remove to allow sun heat during the day.
- Keep the ground free from weeds and mulch to allow absorption of heat during the day and release of heat during the night.
- Erecting a 1.5 - 2.0m high grass or plastic fence around or on the upslope and sides of the crop, leaving the downside open, is very effective in preventing frost.
- A diversion dam can be made by mounding up soil or even simply stacking hay bales.
- Burn crop residue, old tyres or oil very early in the morning around the field as smoke will trap warm air inside it thus keeping cooler air away from the crop. However, this method has to be used with care as this can lead to uncontrolled fires
Points to note
- Due to cold air drainage to low spots, night-time minimum temperatures tend to follow topographical contours.
- Large water bodies upwind tend to diminish frequency of frost events.
- Rocky masses (cliffs) and canopy covers (i.e. taller nearby plants) can increase downward night-time radiation and increase minimum temperatures. However, in some locations, they can block cold air drainage and favour cold air ponding. Every location is unique and the advantages and disadvantages of proximity to rocky masses and canopy covers must be considered separately at each location.
- Soil type affects energy storage and release and hence night-time temperature.
- Local topography and landscape obstacles affect cold air drainage.
- Obstacles should be removed that inhibit down-slope drainage of cold air from a crop.
- Land levelling can improve cold air drainage and eliminate low spots that accumulate cold air.
- Row lines should be oriented to favour natural cold air drainage. However, the advantages from orienting crop rows to enhance cold air drainage must be evaluated against the disadvantages due to more erosion and other inconveniences.
- Minimize upslope areas where cold air can accumulate and drain into a crop. For example, grass and plant stubble in areas upslope from a crop can make air colder and enhance cold air drainage into a crop.
For all questions and comments: email gilbertmhazo@gmail.com. Responses will be provided within the shortest possible time.
6 June 2014
Philemon Buruzi
Local horticultural producers have always indicated that the lack of market access is the major threat to the viability of their businesses. It was widely touted that cheap imports were crowding out the local produce from the best markets. The agricultural authorities recently imposed a ban on the importation on agricultural products in a bid to give local producers a chance. It is fact, that despite this move by policy makers, a good number of our farmers are still not able to access the revered, well paying markets as a result of failing to meet the quality dictates of those particular markets such as hotels, upmarket eateries and big supermarkets. One crop that has quality considerations that are not so obvious is carrots and a lot of producers unknowingly flout them. This article is crafted to enable new carrot growers to pick their way through with relative ease as well as assist the old players to rectify their misdemeanours.
In carrots quality is mainly defined by a specific market but is generally centred on issues to do with the shape, size, colour, succulence, taste and freedom from deformities. The achievement of the right quality requires a combination of good agronomy and an enabling physical environment as enshrined below.
Climatic Conditions
Carrots regardless of the variety or colour generally require cool weather conditions to thrive even though they have been seen to grow in warmer regions as well. Optimal growth is normally achieved under ambient temperatures ranging from 15-220C. Whilst a good number of farmers do not take the temperature issue seriously I would like to point out here and now that if the culture of carrots is attempted and it so happens that the plants are exposed to temperatures below 100C for a prolonged period, one is bound to harvest a crop of long slender, pale roots with a funny taste. Conversely, protracted exposure to temperature upward of 300C results in short, stout and coarse roots with an uncharacteristic strong flavour. These elements are important if you wish to be respected as a supplier to well paying markets.
Soil Characteristics
Carrots are root crops and as such require soils that allow easy displacement as the roots develop. Deep, loose and well drained soils are ideal as carrots do not thrive under waterlogged conditions regardless of the fact that they require constant moisture always. Soil types of choice in this regard would be sand-loams or generally light loamy soils with a pH range of between 6.0 -6.5. Heavy soils are not ideal as they resist the free development of the roots forcing them to assume the undesirable crooked appeal. The ideal soil should not have too much organic matter as this is known to excessively promote foliar growth at the expense of the roots. Excessive organic matter content is also known to cause a raft of deformities such a forking and hairiness. Brackish soils should be avoided at all costs because carrot does not do well under saline conditions. Apart from that, rocky soils will affect the quality of one’s produce by yielding crooked carrots with split roots.

Forked carrots
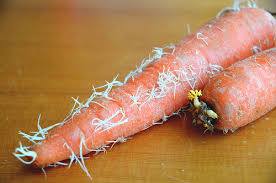
Hairy carrots
Establishment Methodology
Since carrots are established in-situ there is need to pay particular attention to the preparation of the field. Ploughing depth should be at least 30cm in order to sufficiently loosen the soil for easier air and water percolation. One should make the tilth as fine as possible and also ensure that the field is levelled. Fumigation could be undertaken wherever deemed necessary to avoid the nematode problem. A crumbly moist soil is ideal for the germination of the very small and delicate carrot seed. Make shallow lines on the prepared piece of land and sow the seeds, covering them lightly with soil. Planting depth should be 25mm at most in heavy soils but can be as much as 40mm in light sandy soils to facilitate for easier germination and emergence. It is recommended to slightly increase the planting depth when doing a summer crop to militate against rapid soil surface drying which might impede with the germination. This row planting is deemed better over broadcasting as it makes it easier to carry out other management practices such as weeding later on. Rows should ordinarily be spaced 200-400mm apart, but if you are targeting the baby carrots market then the row spacing should be narrowed down to 100mm. The usual seeding rate for carrots is a 5-10kg seed per hectare and this achieves a plant density of between 150- 160 plants per square meter. In order to support sound development of the roots, remember to thin the crop to allow a 10cm gap in-between the plants. Thinning should commence 30 days after sowing and can be accompanied by hilling up. Failure to thin out results in very thin longish roots and at times multiple roots twisted around each other.
Fertiliser requirements
Organic farmers are encouraged to use well decomposed manure at a rate 3-5t/ha applied two weeks before sowing of seeds. Care should be taken when using compost as it has always been linked with the production of hairy carrots. This is also repeated about 30 days post emergence after thinning and weeding. The manure should always be covered lightly by soil. Inorganic fertiliser can ordinarily be applied at the rate of 120kg/ha nitrogen, 71kg/ha phosphate and 170kg/ha potassium. We have compound fertilisers which meet these requirements on the market. I however should stress that actual requirement for fertiliser application varies widely with soil type and previous usage. As such there is need to do a soil analysis in order to be within the correct range of your soil’s nutrient requirements. Farmers should bear in mind that carrots do not need so much nitrogen and excess application of nitrogen fertiliser results in development of carrots with multiple roots, hairs and a funny taste.
Irrigation
It is important to manage your irrigation in such a manner that soil is not allowed to dry out completely at any particular point during the growth phase. Irrigation should commence immediately after sowing whereby water is applied lightly to initiate the germination process. It is necessary to ensure that the soils are moist at all times between sowing and emergence. Water application should be done once or twice a day depending on the evaporation rate but care should be exercised to avoid excess watering as this often results in short stubby carrots, light in colour with a huge diameter. Deliberate reduction in water application should be done as the crop matures to avoid malformations such as longitudinal splitting. On the other hand severe moisture stress during root development causes cracking and hardening of the roots. Irregular and inconsistent watering can result in forking of the roots.
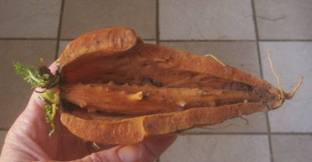
Longitudinal splitting
Weed control
It is important for a farmer ensure that their field is always free of weeds as this ensures that all the fertiliser and water provided benefits the crop entirely. The moment weeds are allowed to spiral out of control, overall yield and quality is compromised. Weeding should be done early enough to rid the field of any competing plants. It can be effected mechanically, by hand or by way of registered herbicides.
Pests and diseases
Common pests that can affect a crop of carrots are aphids, red spider mites and cutworms. Keen scouting can help one to spot the infestation before it spreads wide. Fortunately all of the problematic pests can be contained by insecticides found on the local market. Diseases that one can expect to grapple with are powdery mildew, bacterial soft rot, Alternaria blight, bacterial blight and root knots nematodes. A good use of fungicides as well as rotation with non-host crops like maize can help control these diseases. It is important in the light of disease control to use disease free certified seed always. (This section on pests and diseases will be dealt with in greater detail in another article).

Carrots affected by root knot nematodes
In as much as the issues discussed in this article are not exhaustive, it remains my humble belief that taking note of them can go a long way in improving the yield quality as well as the quantities. So, go ahead and produce carrots that befit the quality expectations of your customers. Indeed the hotels and supermarkets are waiting for your produce but just ensure that it is of the right QUALITY.
For all questions and comments: philemonburuzi@gmail.com. Responses will be provided within the shortest possible time.
http://www.agriuniverse.co.zw
20 May 2014
Philemon Buruzi
When the sack potato technology was introduced, almost every farmer was excited about it. Barely a year on a good number of the same farmers do not want to hear anything about this wonderful way of growing potatoes. This technology is said to be capable of giving a farmer an excess of 15kg of potatoes from one bag, but that is yet to materialise locally. To add salt to injury, Zimbabwe recently woke up to a story in one of the daily papers that the local market was rejecting potatoes grown in sacks. The buyers are said to have cited numerous keeping and cooking quality concerns. This undoubtedly dealt a blow to those who had managed to at harvest something using this technology. I have met several furious farmers who believe that all the yield expectations they were told were fallacies and only directed at duping them of their cash. Well, I will not comment on that but a quick research that I conducted showed me that this technology been successfully used in Israel and USA for years now with very encouraging results. So, where did we go wrong?. Can things be done differently to achieve better results?. The discussion below takes you through some of the key factors to consider in pursuit of excellence as far as sack potato production is concerned.
Season of Establishment
This is one of the important factors that could have to an extent contributed to the failures of most first time potato growers. Farmers should be aware that potato plants are photoperiod sensitive, meaning to say that the average daylight length has an impact on the performance of the crop. Potatoes tend to thrive well when exposed to shorter days accompanied by cooler temperatures. These conditions promote vigorous tuber initiation, whilst the reverse is true for longer daylight periods under higher temperatures which are known to delay tuber initiation. This has an effect of failing the critical timing that should so exist between tuber initiation and peak foliar growth and photosynthetic activity. Once tuber initiation has started, more assimilates are partitioned to the reproductive parts and less to the leaves. Hence when tuber initiation is delayed the redirection of assimilates to the tubers will come late and the leaves will age and go into senescence before fully developing the tubers. This undoubtedly results in too few ill-developed tubers.
Water Management
Constant water supply is critical throughout all the growth phases of the crop. There is however some critical stages which should not suffer from any form of water shortages. This is particularly so during tuber initiation and tuber enlargement. In order for the crop to yield as expected the farmer should ensure that moisture levels do not drop below 65% of field capacity. Water stress in young plants will lead to premature tuber initiation. This leads to yield losses due to the fact that the tubers commence development when the canopy has not developed enough to support the tuber bulking process as expected. This scenario results in a case of a huge number of small tubers despite the level of fertiliser application. Conversely, if moisture levels are sustained at levels above field capacity, yield is negatively affected due to leaching effect as well as oxygen denial of the roots. Not only is the yield affected, the same goes for the cooking quality of the resultant vegetable. So, irrigation of the potato crop should be matched with the respective water-holding capacity of the soils so as to maintain the moisture at field capacity.
Soil type and characteristics
Potatoes are known to do well in widely varied soil types, being tolerant to high pH variations and this has seen them being grown almost in any part of this country. Despite the aforementioned, potatoes ideally require deep, well drained and disgregable soils to do very well. If one intends to use soils high in organic matter such as peat or muck, then the key issue to watch is how to make the soil drain adequately because potatoes will not do well in waterlogged soils. Similarly if one is using excessively draining soils such as sandy soils with limited clay composition and or little organic matter, the farmers should be prepared to raise their bar in terms of fertiliser applications as well as irrigation in order to avoid moisture stress and nutrient deficiencies. In addition to that farmers should be aware of the fact that when establishing potatoes from sprouted tubers, they should be wary of the soil temperatures at the time of establishment in order to give them a good start. Ensure that the soil temperature ranges between 70C-210C and that the soil is not excessively wet.
Fertiliser Application
It is an open secret that the development of a healthy plant is hinged on its access to adequate nutrients from the soil. In a cases where productivity is expected external application of fertilisers to boost the soil levels is common practice. The major nutrients that need to be available at optimal levels are nitrogen, phosphorus and potassium. Generally nutrient deficiencies result in limited canopy growth and shorten canopy duration which results in reduced carbohydrate production and consequently reduced tuber growth rates. On the other hand if nitrogen is excessive it encourages excessive foliar growth and the nutrient and substrate partitioning between roots and leaves is disoriented. This results in vigorous leaf development at the expense of tuber development, yield and may results in some physiological disorders such as hollow heart disorder and associated poor cooking qualities as pointed out by the Zimbabwean markets recently. Phosphorus is essential in stimulating early root development and its importance in a root crop like this can never be overemphasised. Phosphate deficiency often causes poor yield of which the tubers are have compromised keeping and cooking qualities. Potassium is the other most important nutrient to that needs not be deficient at all costs given that it is functional in the deposition of starch. As such deficiency of potash will hamper tuber bulking and growth. On the contrary, excess potassium in the soil causes imbalances in other nutrients notably calcium and magnesium. This is undesirable because calcium and magnesium deficiency is detrimental to tuber quality. Given all this, it is important to optimise the availability of all these essential nutrients.
Seed Physiological Age
The physiological age or generation of the seed that one uses to establish their potato crop remains important whether the farmer uses seeds, seedlings or tubers. Aged seed tends to produce potato plants with numerous stems that sprout and develop rapidly and die early. High stem numbers usually result in a high number of tubers per plant, which reduces average tuber size by reducing the amount of carbohydrate available to each tuber during bulking. Early death also shortens bulking time and limits overall productivity. By comparison, plants from physiologically young potato seed begin to bulk later than those from aged seed, which may shorten the linear tuber growth phase in areas with a short growing season.
Key Observations
Having looked at the key success factors in potato production one could still be wondering where most of our farmers got it wrong, well let me point out a few pitfalls that I have observed in my numerous farm visits.
Sack potato farming has been attempted in all parts of the country, that is from natural region I to V. One can imagine the variations in soil types and climatic conditions that the crop has been grown under yet all looked forward to similar yields. When I looked at some of the production manuals that farmers were given I discovered that they had but just one standard measure for fertiliser. This measure was used by all the farmers across Zimbabwe regardless of the glaring differences in the soil structure, type and fertility levels. Let us look at one of the instructions extracted from one production manual given to one farmer after training, “use a shovel to make a hole of about 10cm deep at the centre of the sack, apply compound s in the hole using a 30gram cup”.This means that 30grams was to be used by a farmer in Mazowe under the nutrient rich red clays and the same cup was supposed to be sufficient for the farmer plying his trade under the sandy soils in Chiwundura. This has resulted in deficiencies or excessive fertiliser applications to the detriment of the entire crop and the farmer’s pocket. One can easily see that most of the quality concerns raised by the market as alluded earlier in the discussion emanate from improper application of fertilisers.
The other observation that I made was that most of our farmers who made a go at sack potato did not take into cognisance the planting dates that are recommended by agronomists for both the summer and winter potato crops. If you look at the times when they expected to enter the market and calculate backwards, it is evident that some of the potatoes were sown at the wrong time and the photoperiod effect caught up with them.
Most farmers used good quality seeds such that there was no problem emanating from using poor quality seeds. However water management was an issue especially with first time farmers and I have observed that some of the cases that recorded very poor yields had had problems in watering to field capacity. Now as seen above if it so happens at critical stages in the plant growth cycle yield losses incurred from there are massive.
The major reason why most of the results from sack potato have been so disappointing is that sack potato plant is grown in a limited environment such that any slight imperfection in this microenvironment derails production in a big way. For instance when sown in the ground, excessive nitrogen can be diluted by leaching thus moderating the negative effects but that is not the case with the sack culture. Hence the future of this technology lies in our ability as farmers to take cognisance of the key success factors, acting in precision and paying attention to details as expounded by qualified agronomists. Lets seek adequate knowhow first before we invest our energy, time and money.
For all questions and comments: email philemonburuzi@gmail.com. Responses will be provided within the shortest possible time.
By Philemon Buruzi
Of late there has been increased interest in the cultivation of potatoes in Zimbabwe. The advent of the sack potato technology has fanned the flame to levels never imagined before. This has seen a number of farmers trying their luck with this wonderful crop which apart from being relatively rewarding financially, harbours the potential to contribute meaningfully towards attainment of household food security. I however have noted one sad scenario during the advisory visits that I make to different farms around the country. Amid the excitement of taking on a new technology and the prospects of a wonderful harvest, punctuated by the anticipated cash inflow from the resultant sale of the crop, many a farmer have forgotten to attend to one critical aspect of the whole show, i.e disease control. Sadly this has led to massive collapse of many projects to date. That has prompted me to put together this article which is the second in a four-part series meant to address the most devastating and economically important potato diseases in a bid to hedge in the farmers’ bottom line. As you might recall, last time I dwelt on Potato Late blight. In this instalment we would like to focus our attention on Potato Early Blight.
Early Blight
Early blight is a disease of potatoes that is caused by a fungus. This disease more pronounced on its attack on leaves and tubers and to a lesser extent the stems. For the infective fungi to proliferate, field conditions should be such that temperatures range between 20-300C amid a protracted period of high relative humidity and general leaf surface wetness. Research has shown that the fungal infectivity and spread is exacerbated by field conditions whereby there is alternating wet and dry conditions. Away from external conditions the internal integrity of the potato plant itself matters, as stressed plants have been found to be extremely susceptible to an Early blight attack. A potato crop reeling under conditions of poor nutrient supply, a barrage of insect pests, droughty conditions or any other stress factors normally succumb to early blight even in circumstances where they could have just resisted the disease. Early blight tends to proliferate faster as the plants begin to go into senescence as evidenced by the fact that the attack is more apparent in older leaves than in shoots.
The spread of the disease from infected plant material to new area take effect via transfer of the infective spores. The spores are dispersible via wind , rain , irrigation water or mechanically through equipment. The establishment of a new potato field close to one that was hit by early blight in the yesteryear is recipe for disaster as cross contamination readily occurs. This is possible due to the fact that the disease can remain alive in the soil or plant debris for a considerable period of time. Potato early blight tends to attack at the flowering stage, striking mainly the leaves. Tubers do not get affected until they get into contact with the infective spores mostly during harvesting. The extent of tuber infection by early blight is determined by the degree of interaction between the infected material and tubers, as well as the existence of bruises on the skin of the tubers.
How to Positively identify Potato Early Blight
Leaves – foliar symptoms start off as small circular dark spots on the lower older leaves as shown in the picture below.
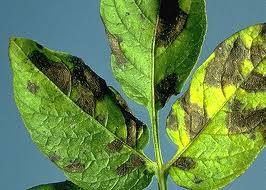
Hence when scouting for early blight be prudent to check the bottom older leaves as they happen to be the first to get affected.
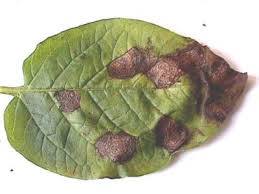
As the disease progresses the affected areas appear dark brown-to-black with concentric rings around giving a ‘target’-like appearance within the dead tissue. The lesions grow bigger and join together to be one, but are kept in check by large leaf veins. This results in the exhibition of an angular appearance of the affected area.
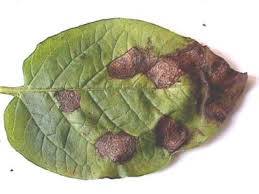 Depending with the physiology of the plant it is common to observe the affected area being surrounded by a chlorotic border of gradually dying tissues. Infection of the stems can also occur and appear as small dark lesions, but these do not cause significant damage to the integrity of the plants as compared to the leaves.
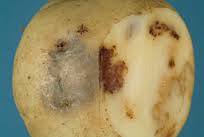
Tubers- affected areas on tubers tend to be dark, sunken and often bordered by a raised margin as seen in the picture below:
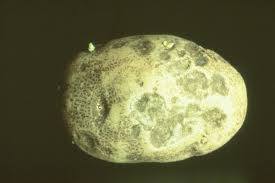
The underlying tissue assumes a leathery feel or rather corky texture. The appearance of the affected zones become an uninviting reddish to dark brown. Such tuber when stored for a considerable period of time shrivel and lose weight on the own.
Differential Diagnosis
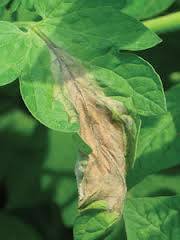
It is always important to exercise due care and diligence when scouting so that when cornered with an anomaly one is able to identify the disease in question accurately. This is important as it determines one’s reactions in addressing the problem. I mention this in light of the fact that there are several disease that are similar to early blight in their manifestations such that confusing them with early blight has always taken place. Such diseases are late blight, fusarium rot, botrytis and brown leaf spot. The primary differentiating sign between early blight and late blight is that the lesions under early blight are not able to transcend across the leaf veins (left photo) thus assume an angular appearance which is contrary to late blight as shown below.
When looking at the tubers one should check for the distinctive raised margins around the affected part to discern that the causative is early blight as that feature is not found in the case of late blight. Still on tubers, of you happen to notice that the affected area is whitish-pink in appeal, rest assured that you have a case of Fusarium rot as early blight exhibits a brown colour.
How to Control Potato Early Blight
The first line of defence in terms of this disease is to ensure that you do not introduce it onto your farm. This is achieved through use of certified seed each time you plant potatoes. It also help to break the disease cycle by practising crop rotation with a crop of a different class such as a cereal. Always ensure that infected plant debris from the previous potato crop are destroyed prior to introduction of a new crop. Avoid using a field which is just close to one where there was a case of early blight as the infective material can lie dormant in the soil, harbouring requisite capacity to infect another crop the next season. In order to minimise losses it is advisable to plant cultivars that are resistant to early blight. Generally all early maturing cultivars are highly susceptible, so its wiser to settle for late maturing varieties which are famed for moderate early blight resistance. Ensure that your agronomic practices are such that your crop is not subjected to unnecessary stress as this tends to increase the susceptibility to early blight. Farmers should spray fungicides soon after the appearance of bloom and should continue to scout through their crop. Spray at the first sight of infection to curb the spread and damage. The need for due care during harvesting cannot be overemphasised given that most if not all of the tuber infection occurs during harvesting, particularly if the skin gets damaged. It remains my humble belief that if the above measures are judiciously taken on board by a potato grower one of the many problems chewing away your profits could be eliminated. Look out for the next instalment on yet another potato disease common in Zimbabwe.
For all questions and comments: email philemonburuzi@gmail.com. Responses will be provided within the shortest possible time.
http://www.agriuniverse.co.zw
Philemon Buruzi
Despite the fact that oyster mushrooms are relatively new on the Zimbabwean food market, they are fast becoming a favourite of many customers countrywide. Oyster mushroom cultivation is the simplest and least cost when compared to other types of mushrooms. This is so because oyster requires no special inputs but rather can be grown using locally available materials and even makes use of agricultural waste. The only requirement that a prospective mushroom grower needs to outsource apart from the mushroom spawn is knowhow and that is what I endeavour to provide by putting together this article.
Definitions
Terms used in mushroom growing which might be new to the uninitiated are given below;
Spawn - this is the mushroom ‘seeds’,
Spawning - refers to the process of ‘planting’ the mushroom,
Substrate - is the agricultural waste on which the mushroom grows e.g wheat straw,
Fruiting - formation of the mushrooms under specific house conditions.
Required Facilities and Equipment
Fruiting house, spawning house, spawn, thermometer, hygrometer, water sprayer, buckets, plastic bags, sterilising drum, string
Spawn and Substrates
Spawn is purchased from spawn laboratories. Substrates can be any of the following materials-sawdust from deciduous trees, banana leaves, cotton waste, milled maize cobs, chopped rice or wheat straw, chopped maize stalks. Ensure that the substrate has high nutrient content, good water-holding capacity and is well aerated. To control acidity, add 2% lime by weight and 20% wheat bran to improve quality.
Spawning Room
After spawning, substrate bags are kept in this room for development of the mycelium. This room should provide dark conditions and a temperature of around 240C. Alternative the same mushroom house can be used provided it can be made dark as required during incubation.
Fruiting House
This is the room in which the mushroom grows. The size of this room depends on the scale that the grower wants to operate at. The walls of the room can be made of any material be it bricks, wood, thatch or even pole and dagga. It is recommended to line the walls with plastic sheeting in order to relative manage humidity better. Ventilation should be adequate, hence air vents or windows need be in place. The room should have enough light as and when needed. Wooden shelves or racks should be fitted to handle spawned substrate bags. The house should provide for temperature maintenance between 180C-250 C and humidity of 80-90%.
How to do it
Below is a four stage process of growing oyster mushroom presented in a step by step format;
Step One - Substrate preparation
Chopped or shredded substrate is soaked in water overnight. After 24 hours excess water is drained off and lime is added. Transfer the mixture into the sterilising drum and subsequently filled with hot water. The drum is allowed to boil for 60 minutes before transferring the substrate onto a plastic sheet to cool off to between 38-400C.
Step Two- Spawning
Pack the substrate into transparent plastic bags adding the spawn even layer upon layer. Care should be taken not to pack the substrate too tightly or too loosely. Also ensure that this stage takes place under hygienic conditions as diseases tend to enter at this phase. Tie the open end of the plastic bag immediately after filling.
Step Three- Incubation
Place the spawned bags in dark room at 240C or simply cover the bags with black plastic sheets. Incubation lasts between 14-40 days and full colonisation is evidenced by white mycelium covering the whole bag.
Step Four- Fruiting
Initiate the formation of the mushroom bodies by exposing the bags to light. Once light hits the bags fruiting commences. After 24 hrs make long cuts at the top and bottom of the bags. Mushrooms will start to form in 4 days. Temperature should be maintained between 20-280C whilst humidity is between 80-95%.
Step Five-Harvesting
Mushroom are ready to be plucked 4 days after the emergence of the fruiting body. handle by the stalk twist gently and pull out. Harvesting is best done in the cooler hours of the day. Immediately refrigerate without freezing to preserve freshness. Make more long cuts around the centre of the bag for more mushrooms to emerge. Continue to harvest till the substrate turns colourless and of a soft feel. In general terms 10kg of substrate should give you a yield of between 10kg-20kg of mushrooms.
For all questions and comments: philemonburuzi@gmail.com. Responses will be provided within the shortest possible time.
